

If you’ve got yourself some battle ropes (aka battling ropes) or you saw them at your gym but you don’t know how to use them or you are simply looking for some new exercise and workout inspiration, then we have you covered.
In this article, we are going to teach you how to use battle ropes correctly for 20 different exercises, which range from classic battle rope exercises to more dynamic exercises that you may have never seen before. After that, we have sample battle rope HIIT workouts, stand-alone workouts, finishers, and even warm ups that you can implement into your training regimen.
With everything below, you are going to stay very busy and have plenty of fun with your battle ropes for many months to come.

ARE BATTLE ROPE EXERCISES GOOD?
Battle ropes are an extremely effective and versatile total body training tool. Battle rope exercises can be tailored to endurance training, strength training, explosive training, and hypertrophy training. Moreover, they are absolutely fantastic for fat loss as battle ropes raise the heart rate up high, and fast. Depending on the battle rope exercise and intensity, you can burn as many as 20 calories per minute (which is the equivalent to sprints).
WHY WORKOUT WITH BATTLE ROPES?
Battle ropes are best used to lose fat (burn calories), build up core strength & stability, and increase explosive power and muscular endurance. In fact, when it comes to these aspects of fitness, the battle rope (aka battling rope) is arguably the best training equipment out there.
And while they are also adequate for building muscle (if you know what you are doing, which we are going to teach you), there are better tools for this, such as dumbbells and barbells.
That said, in terms of building up some boulder 3D shoulders and strong arms, battle ropes are up there with free weights.
All in all, when it comes to total body workouts and sculpting, building all around athleticism, and increasing grip endurance, battle ropes are top of the fitness “food” chain.
This is just a simply explanation of why battle ropes are worth using for workouts. If you want to learn more, check out our article on the 11 Inimitable Benefits of Battle Ropes.
WHAT MUSCLES DO BATTLE ROPES WORK?
You can hit every muscle with battle ropes, but they are particularly effective for the shoulders, arms, traps, legs, glutes, and core.
As you are going to see with the exercises in this article, there are so many different battle rope exercises and ways to use them to target or emphasize specific muscles.
Overall, though, battle ropes are a full body training tool.

HOW DO YOU USE BATTLE ROPES?
There are many ways to use battle ropes, both in terms of exercises and workouts. In the general sense, it is a full body training tool that will help with fat loss, muscular endurance, explosive power, and core strength.
Common ways to use battle ropes include:
- Workout finishers, as a way to fully exhaust the muscles, get some core work in, and increase calorie burn (for fat loss).
- HIIT, as the high intensity nature of battle rope exercises fit very well into HIIT workout formats.
- Stand Alone Workouts, as a way to just get a quick yet effective total body workout in.
- Warm Up, as a way to get the heart rate up, body temp up, and blood flowing to the joints and muscles so they are primed and ready for a weight training session.
In regards to exercises, you can create waves, you can slam the ropes, whip the ropes, and pull the ropes, all from different stances and with or without combinations of bodyweight movements, as you are about to see. It’s a very versatile piece of training equipment that lends itself to creativity of movements.
HOW TO ANCHOR A BATTLE ROPE?
Before you can do any of the exercises below, you need to know how to anchor the rope. If you are using battle ropes at the gym, then you likely don’t need to worry about this as it will already be anchored and ready for use, but if you have just bought battle ropes, here’s a few methods of anchoring them:
- Circular Wall Anchor: This is an anchor that you buy and secure to a wall with bolts. Then you can simply loop the battle rope through its designed hoop(s).
- Strap Anchor: A strap anchor consists of two straps. You secure one to the battle rope and the other to a sturdy object like a fence, post, or tree and then the straps are connected together by a carabiner.
- Chain Anchor: This is just a strong metal chain that you can loop the battle ropes through and then wrap around any sturdy object and clip it in.
- Ground Spike Anchor: This one doesn’t involve anything but the ground. All you have to do is fix the spike into the ground and then loop the battle rope through the designated area.
And, of course, you can just simply loop the battle rope around any smooth pole or a squat rack beam. A lot of squat racks actually have metal hoops at the base as well that are perfect for anchoring battle ropes. There’s nothing wrong with wrapping a battle rope around a secure object, you just want it to be smooth as if it has an abrasive surface you can damage the rope over time.
WAYS TO GRIP BATTLING ROPES
Before we begin (finally), let’s go over the four main grips that you can use when performing battle rope exercises. Not only do some exercises call for specific grips, but by changing your grip for any given exercise, you can emphasize different muscles and alter how your body is being stressed.
- Neutral Grip: Palms facing each other, thumbs pointing forward (most common grip).
- Hammer Grip: Palms facing each other, thumbs pointing up.
- Overhand Grip: Palms facing the ground.
- Underhand Grip: Palms facing up.
Some grips will feel better than others depending on the exercise. There really are no rules (but we will recommend certain grips for each exercise below). See what feels comfortable for your wrist and is the most optimal for the exercise at hand as well as how it hits your muscles.
HOW DO BEGINNERS USE BATTLE ROPES?
Beginners should get comfortable with the basics before moving on to more dynamic exercises. The basics are the wave, the pull, the slam, and the whip. Once you learn these, you really have everything you need in a battle rope workout.
Even many advanced athletes just stick to these battle rope exercises. So, as a beginner, you will be starting out with the best and most important movements!
Since the wave is the quintessential battle rope exercise, this is the first and most important one to learn. Because of that, we will provide more thorough instructions for this movement than we will the rest.
THE BATTLE ROPE WAVE FOR BEGINNERS:

The wave is actually pretty simple as all you are doing is creating undulations with the rope in an alternating fashion (one hand goes up as the other goes down). Most people can just pick up a battle rope and do this exercise straight away.
HOWEVER, being able to do it and doing it with great form is another thing. So, let’s go over some important cues for the battle rope wave exercise.
- Grip: The grip for a battle rope wave is probably pretty obvious, you hold it with a neutral grip (palms facing each other). But what a lot of people do wrong is they hold it too far towards the end of the handle. What you want to do is have your hands closer to the rope itself, even with your thumb on the rope (but the rest of the hand on the handle). By doing this, you can flick your wrist better, which is needed to create waves that reach the anchor point. Moreover, your hands won’t start to slip off it if they get sweaty, requiring you to reset your hands mid-set. Another thing about grip, don’t overgrip it. You are not trying to ring the life out of the handle. You are just trying to hold it secure enough to make sure it doesn’t jump out of your hands.
- Arms: Make sure your elbows have a slight bend in them. They should be held in front of you in a way that looks like you are driving a horse and buggy.
- Starting Position: Pull the rope out all the way and then step forward so your arms can be down directly at your sides (which will give the rope slack). Then, step in another foot or two, and that’s your starting position. You want that rope to have slack, not to be pulled tight from the starting position as not only will that inhibit the waves and proper technique, but it can’t create injuries.
- Stance: Make sure you get in a very solid stance before you start. Your feet should be shoulder-width apart. Get into an athletic stance, which means your knees slightly bent, hips slightly back and down (i.e. quarter squat), core tight, and chest forward. This will keep you sturdy and it will ensure your back is straight. Also, it will allow you to control the battle rope, not the other way around.
- Waves: You want to flick the rope rather than tug it towards you. Imagine that you are throwing the ropes up and away from you by flicking your wrist quickly as your raise and lower the ropes, alternating between your right and left side. Eventually, this will become natural when doing the battle rope wave, but keep it top of mind when first starting out, as tugging at the rope places stress on the shoulders (and this improper technique is what gives battle ropes a rep for being hard on the shoulders).
- Rope: In regards to the rope itself, length and thickness is important. If you are using a rope that is too heavy or too long for your strength and fitness level, then you won’t be able to make the waves reach the anchor, which is what they are supposed to do as that gives your feedback with each rep. If the rope happens to be too long or thick for you and you have access to a shorter or thinner battle rope, switch to the smaller one. Ideally, you want the waves to be reaching the anchor point.
- Breathe: Don’t just concentrate on the movement, concentrate on your breathing too. This is an intense exercise so breathing is absolutely necessary to complete sets of adequate length. So, take long, deep breaths as your work those waves.
- Hold Your Position: Don’t creep forward as you are doing your set. A lot of people tend to move forward toward the anchor as the set goes on. This creates too much slack which makes it too hard to do proper waves (the starting position we mentioned above is the perfect middle ground of just enough slack, but not too much).
Keep these cues and tips in mind, as they apply to a lot of the exercises to come.
Note: Battle rope double waves involve moving your arms up and down at the same time. All the same cues apply to doubles waves.
20 BATTLE ROPE EXERCISES
Below are 20 awesome battle rope exercises to incorporate into your battle rope workouts.
We are starting out with the most essential and basic battle rope exercises before moving into the more dynamic ones.
For each exercise, we will cover the how to, emphasized muscles (if any, remember, many battle ropes are truly full body!), and overall what makes the movement special.
While all of the exercises are great for intermediate to advanced trainees, beginners should stick to certain exercises at first. We will mark the battling rope exercises that are good for beginners with an “*”
Without further ado, let’s begin...
1. BATTLE ROPES WAVES*

The battle rope wave is the most classic battle rope exercise. It’s great for blasting fat, getting lean, and building muscle (particularly in the biceps, forearms, shoulders and core).
- Grab the battle ropes a neutral grip (see 'ways to grip battle ropes' if you don't remember this grip) and position your body so there is some slack in the ropes (remember our tip above about the ‘Starting Position’). Note: You can also use a hammer grip for waves.
- Get into an athletic stance and bring your arms out in front of you like you are driving a horse and buggy.
- Bring your right arm up and flick your wrist like you are throwing the rope up and away and then bring your arm down, as your right arm is coming down, bring your left arm up and do the same motion. Keep alternating right and left as you create beautiful undulating waves down the rope.
Be sure to keep your elbows in to keep the movement at the biceps. This will allow you to not burn out as quickly.
2. BATTLING ROPES HIGH WAVES

The high wave is just like the standard wave but you will be a little more upright with your torso and you will be creating large waves (so your hands will be moving through a greater range of motion).
This brings the intensity of the movement up and places more emphasis on other upper body muscles like the chest, traps, lats, forearms, and shoulders.
- Grab the battle ropes with a neutral grip and position your body so there is some slack in the ropes (remember our tip above about the ‘Starting Position’). Note: You can also use a hammer grip.
- Stand with your feet about shoulder width apart and get into a quarter squat position with your back more upright.
- Bring your arms out in front of you like you are driving a horse and buggy.
- You will be performing the alternating waves just like you would a standard wave but your arms will be coming up above shoulder level and then down to your thighs.
You will have a little less bend in your elbow and bicep movement during a high wave than a standard wave and there will be more movement at the shoulder. The undulations will be larger and higher.
3. BATTLING ROPES LOW WAVES

The battle rope low wave is essentially the opposite of what a high wave is. It involves less range of motion and your body will be closer to the ground. This brings most of the emphasis into your arms (as well as your low back to hold this position).
- Grab the battle ropes with a neutral grip and position your body so there is some slack in the ropes (remember our tip above about the ‘Starting Position’). Note: You can also use a hammer grip.
- Stand with your feet about shoulder width apart, bend your knees slightly and push your hips back. Lean your body forward more as seen in the pic, but be sure to keep your spine straight.
- From here, create short alternating undulations. Most of the movement will be in your biceps.
You will not have much shoulder movement like you will with the high wave. Moreover, the alternating motion should be very quick. As such, so will the waves, and the waves will be short and rapid.
4. BATTLE ROPES KNEELING WAVE

In terms of your arms, this movement is just like a standard wave. However, you will be doing this from a tall kneeling position. Essentially, this is a good move for beginners who need to grease the contralateral groove of the arm motion.
This can be a better place to start than the standard wave for some. For everyone else, this is a cool option for taking the legs out of the equation and focusing just on the upper body (although the glutes will still be activated for stability).
- Grab the battle ropes with a neutral grip and position your body so there is some slack in the ropes (remember our tip above about the ‘Starting Position’).
- Get down into a tall kneeling position with your back upright.
- Bring your right arm up and flick your wrist like you are throwing the rope up and away and then bring your arm down, as your right arm is coming down, bring your left arm up and do the same motion. Keep alternating the motion between your right and left arm.
5. BATTLE ROPES HALF KNEELING WAVE

The half kneeling is the same thing as the tall kneeling wave but actually the half-kneeling position changes up the dynamics of the movement quite a bit due to its unilateral positioning. It sets you up so that you are producing power from one side of your glutes through your core for stability.
And, like the tall kneeling wave, it also forces you to create more power through the upper body since you won't be driving much force through the ground from your feet. All in all, it may seem like a beginner exercise, but this is one is pretty difficult because it’s hard to keep stable.
It’s great for anyone who wants to work on strength of both the upper body and at hip level.
- Grab the battle ropes with a neutral grip and position your body so there is some slack in the ropes (remember our tip above about the ‘Starting Position’).
- Get down into a half kneeling position with your back upright.
- Bring your right arm up and flick your wrist like you are throwing the rope up and away and then bring your arm down, as your right arm is coming down, bring your left arm up and do the same motion. Keep alternating right and left. Note: The arm on the side of the forward leg should be moving along the outside of the thigh, not inside.
Be sure switch the half kneeling position each set (so right leg in front then left leg in front).
6. BATTLE ROPES SEATED WAVE*

Like the tall kneeling wave, the seated wave allows you to grease the groove of the arm motion. However, the seated waves completely removes the lower body as not even the glutes are going to be involved. This is all upper body.
- Grab the battle ropes with a neutral grip and position your body so there is some slack in the ropes (remember our tip above about the ‘Starting Position’).
- Get down into a seated position with your legs out in front of you. Keep your back upright as best as possible. Sit tall.
- Bring your right arm up and flick your wrist like you are throwing the rope up and away and then bring your arm down, as your right arm is coming down, bring your left arm up and do the same motion. Keep alternating right and left as you create waves down the rope.
7. BATTLE ROPES INSIDE CIRCLE

Once you get the wave down, you can start playing around with other motions, such as circles. This variations is the Inside Circle, so you will be creating a circle with your arms counterclockwise (inward motion).
This exercise is great for your arms, shoulders, upper chest, lats, traps, and all the scapula stabilizer muscles. It promotes strengthening of your postural muscles, helping to combat society’s ever present tech neck and rounded shoulder issue.
Of course, it is also great for your legs, glutes and abs, as they need to work in an isometric fashion to keep your upper body stable.
- Grab the battle ropes with a neutral grip and position your body so there is some slack in the ropes. Note: You can also try an overhand grip with this one.
- Get into an athletic stance and bring your arms slightly out in front of you.
- From here, create a big inward circle motion with both hands simultaneously. Your arms will move outward and then inward to create the circle (counterclockwise). When both hands reach the middle, they will be about a hand width away from each other, they should not come in contact.
- Continue this circular motion with your arms for a set number of reps or duration of time.
8. BATTLE ROPES OUTSIDE CIRCLE

The Outside Circle is just like the Inside Circle except your arms will be moving clockwise. Like the Inside Circle, the Outside Circle is a total body exercise that emphasizes the arms, shoulders, upper chest, lats, traps and scapula stabilizer muscles (which your traps are actually part of). It’s really a great way to build mobility, stability and endurance at the scapula level.
- Grab the battle ropes with a neutral grip and position your body so there is some slack in the ropes. Note: You can also try an overhand grip with this one.
- Get into an athletic stance and bring your arms slightly out in front of you.
- From here, create a big outward circle motion with both hands simultaneously. Your arms will move inward and then outward to create large, wide circles. When both hands reach the middle, they will be about a hand width away from each other, they should not come in contact.
- Continue this circular motion with your arms for a set number of reps or duration of time. Try to create force through your circles throughout the entire set.
9. BATTLE ROPES FLY WHIP

The whip is another popular movement for battle ropes. The whipping movement is sort of like an explosive rear delt fly to chest fly. As such, your arms, shoulders (rear delts and front delts in particular), chest, traps, and rhomboids will be emphasized the most.
With the Whip, you will essentially be creating horizontal waves.
As you are whipping the ropes away from each other and then back toward each other, they may cross paths. This will not effect the movement. Your arms, however, will not cross each other, so when they start to meet at the middle, whip the ropes outward by flicking your wrists.
- Grab the battle ropes with a neutral grip and position your body so there is some slack in the ropes. Note: You can also try an overhand or underhand grip.
- Get into an athletic stance and extend your arms up to about sternum level with a slight bend in your elbow.
- Whip the ropes in a horizontal outward motion away from each other while keeping your elbows fixed. When your elbows are about in line with your shoulders, whip the ropes back inward towards each other through the same path of motion.
- As your arms come to your centerline (don’t bang your hands together), whip them back out immediately. Keep your arms up at about sternum/upper ab level as you continue this horizontal outward and inward motion for the duration of the set. Note: It’s also ok to use a slightly upward diagonal motion as you move your arms outward and a slightly downward diagonal motion as they move inward. This is a different variation to try.
It’s common for people to move toward the anchor or in an out of the quarter squat during this exercise. It’s also common for people to let their upper body slouch forward. Try to maintain a strong athletic stance throughout the set.
10. BATTLE ROPES POWER SLAM

Here is one of our favorites, the Power Slam. Unlike the other battle rope exercises so far, this one is about power (hence the name), so the focus is on building explosive strength, not muscular endurance. As such, sets will be shorter and more taxing as you will be using all of your force to slam the ropes down each rep.
As for muscles worked, this is a total body movement, so literally every muscle is going to be firing off as you transfer force from your lower body to your upper body and back down slamming the ropes.
That said, it is particularly beneficial for building strength (and muscle mass) in the shoulders, lats, and arms, and it significantly challenges all of your core stabilizer muscles, which includes your glutes.
With this version of the Power Slam (which is the most common), you will bring your arms up to about head level and then down between your legs as you slam the rope. Like waves, this will create large vertical undulations toward the anchor.
Note: This exercise is best performed with a thicker rope, but any battle rope will do.
- There are two ways you can grab the rope. Option one, you can hold it with a hammer grip. Option two, you can hold it with a neutral grip.
- Get into a strong athletic stance. Bring your arms up simultaneously to about head level and then forcefully slam the rope down.
- Bring the rope back up with your elbows fixed to head level and then slam it down again. Continue this for a set number of reps. Remember, this is not an exercise to do for long sets. You want to do a number of reps where you can sustain explosive power. Stop when force starts to decrease. For most people, this is usually around 10-15 reps, depending on the thickness of the rope.
With the Power Slam, it is common for people to move forward toward the anchor. Try to keep your feet planted firmly so you don’t do this. The closer you move to the anchor, the more slack you will have and the harder the exercise will be come.
Stay firm in your stance from the start.
11. BATTLE ROPES SIDE TO SIDE
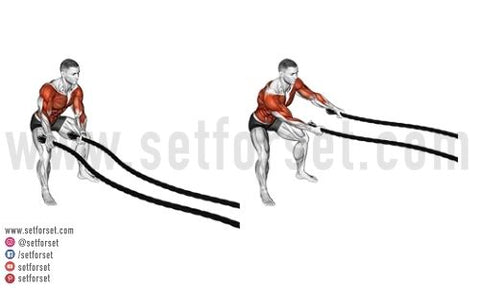
The Battle Rope Side To Side is an awesome exercise that is going to work you through the transverse plane (which is the most overlooked plane of motion for most weightlifters). This is how you build dynamic, real world core strength, as it prepares you for any twist and turn life throws at you.
But make note, this is an anti-rotation exercise, not a rotational exercise, so your hips will remain squared forward and your feet firmly planted into the floor. The goal is to move the ropes side to side while maintaining core stability.
So, your arms will follow the path of the ropes but your core will resist movement. With that, you are going to build some serious core strength and injury resilience. This is an athletic exercise through and though.
- Grab the battle ropes with either an underhand, overhand, or neutral grip, and position your body so there is a little slack in the rope (not as much as when doing waves, but still some decent slack).
- Get into an athletic stance and be ready to keep your legs planted and your hips down in a quarter squat position.
- With your arms extended (slight bend in your elbow) and slightly downward, swing the ropes to your right side (about 30-45˚from your centerline) and then forcefully swing the ropes to your left side. As you do this, your arms and upper torso will follow the path of the ropes, but try to keep your core squared forward (although some slight rotation will happen) and hips firmly squared forward (they should not rotate at all).
- Continue this for a duration of time or number of reps.
12. BATTLE ROPES SIDE RAISE SLAM

The Battle Rope Side Raise Slam is rotational version of the power slam, so you will be slamming the rope on one side, then picking it up and slamming it on the other.
While you don’t need an object in the middle to slam the rope over (as seen in the pic), it does help ensure that you are performing the exercise with best form and enough intensity.
Likely, if the rope hits the object (as long as it’s positioned correctly), the set is over as your energy force has decreased to the point of needing a rest. Like Power Slams, this exercise is about explosive power and strength, not so much endurance.
This exercise is going to work all the muscles in your body from the legs up, especially the shoulders and legs. And, since it is a transverse exercise, it is particularly effective for building explosive core strength, which will translate into improved ability to transfer force from your lower body to your upper body, which is essential for sports.
This means better acceleration, deceleration, and rotational power, as well as injury resilience.
- There are two ways you can grab the rope. Option one, you can hold it with a hammer grip. Option two, you can hold it with a neutral grip.
- Get into an athletic stance and bring your hands together (about a fist-width apart) to your right side, just outside of your right leg. Your shoulders and chest will be facing toward the rope, so you will have a slight twist in your core.
- From here, bring your arms up (arms should be extended with a slight bend at the elbow) as you move the rope to the opposite side. Your arms will come up to about head level as they reach centerline before coming down as you slam the ropes on the left side. Remember, you can use an object like a tall foam roller to slam over so that you are keeping good form.
- Repeat by slamming to your right and left side for a number of reps. Typically, 8-15 reps is enough. This is about explosive power, not endurance.
While your torso will be rotating, your hips will not, which means your feet will remain planted to the floor and your body in a quarter squat athletic stance. Only your torso should rotate as it follows the path of the ropes.
13. BATTLE ROPES ALTERNATING WAVES WITH KNEELING GET-UP

If you want to take the classic alternating waves exercise up a few notches, give this dynamic variation a try.
The alternating waves with kneeling get-up is exactly as it sounds. You will be performing kneeling get-ups as you do the alternating waves. So, you will start from a kneeling position, then move into a half-kneeling position, and then up on your feet, then back to half kneeling, then back to tall kneeling (which would be one complete rep).
With that, practicing the tall-kneeling wave and half kneeling wave we showed you earlier before trying this exercise, which combines all three variations, would be a smart move.
Essentially, what this exercise brings to the table is more leg and glute work, requiring both isotonic and isometric contraction, and a lot more core stability. So, if you want to truly make the wave as much of a total body exercise as possible, this is it.
- Setup in a tall kneeling position with your knees directly under your hips and both hands holding the battle rope as you would a standard wave.
- Start creating alternating small waves and slowly stand up out of the tall kneeling position into a half kneeling position and then finally driving up from the heel of your front foot to a standing position, all the while maintaining the alternating waves.
- From the standing position, reverse lunge back to a half kneeling position and then to a tall kneeling position, while still maintaining the smooth, rhythmic motion of the alternating waves.
- Repeat for the desired time, duration, or number of reps. Note: Be sure to change the leading foot with each rep.
The goal is to use your arms to generate force and absorb the impact/feedback with your legs. Keep your core tight throughout the exercise to help transfer force through the floor and keep the spine somewhat neutral as your arms and legs are moving.
Also, keep your knees soft to help lessen the stress on your joints and where it should be, on your musculature.
14. BATTLE ROPES RUSSIAN TWIST

If you thought Russian Twists with dumbbells, kettlebells or medicine balls were hard, wait until you try Battle Rope Russian Twists. Not only is the weight distribution different, but the rope will be undulating as you pass it over your body each time, creating even more instability.
This is going to require your core to work over time. And, of course, this exercise emphasizes the shoulders, traps, and arms as they are primary movers of the rope.
- Sit on the ground with your knees slightly bent and heels to the ground.
- Grab the rope with a hammer grip. Bring your hands close together and keep them on the outside of your right leg.
- Lean your upper body back slightly and then brace your core as you lift both ropes up and over your legs to the other side. Be sure to keep your spine straight and your hips stationary. The movement is at your arms, not rotation of the torso. It is an anti-rotation exercise.
- Continue lifting the ropes up and over from one side to the other for a number of reps or a duration of time.
You don’t necessarily have to slam the rope down when it reaches the side, but the rope should be hitting the ground with some force.
You can be explosive with this exercise. And remember, it is not a rotational exercise, it is an anti-rotational exercise, so your arms are moving, but your torso is remaining squared forward.
15. BATTLE ROPES ALTERNATE ARM WAVE JUMP SQUAT

The Battle Ropes Alternate Arm Wave Jump Squat turns the quintessential explosive endurance exercise into an explosive, plyometric endurance and hypertrophy exercise thanks the jump squat and alternating wave combo.
Be warned, this exercise is not for the faint of hearts. This is going to absolutely take your breath away. It has so much packed into one. You get hypertrophy, strength and endurance benefits.
It’s hard to say which muscles are being emphasized since so many muscles are going to be working overtime on this one, but it is particularly great for the legs, hamstrings, calves, glutes, arms, shoulders, chest, traps, lats, and of course, your core (we probably could of just left it at this is total body, because it truly is).
- Grab the battle ropes with a neutral grip or hammer grip and position your body so there is some slack in the ropes.
- Get into the same starting stance as you would a squat and bring your arms forward in front of you.
- From here, start creating the alternating waves as you normally would while simultaneously lowering down into a squat.
- When you reach the bottom of the squat, explosive up and jump straight into the air (as you jump, try to keep the waves going - this is going to boost your core stability game big time).
- Continue squatting and jumping as you make quick, explosive alternating waves with your arms for a duration of time or a number of reps.
Since this is a hybrid plyometric, strength and endurance exercise, you probably won’t be able to go too long, but you should try to use max effort for a fair number of reps (i.e. 10-20).
16. BATTLE ROPES ALTERNATING ARM WAVES SIDE LUNGE

This is an awesome battle rope exercise that focuses on upper body endurance and lower body strength and hypertrophy. However, this is only for those with good hip mobility. Before you can do this exercise, you need to be able to do a proper side lunge (if you can’t, work on that first before trying it with battle ropes).
The Battle Ropes Alternating Arm Waves Side Lunge works your entire lower body both for hypertrophy and strength. Moreover, with the arms controlling the ropes to make waves, the lower body also needs to stabilize the body, which makes the lower body muscles engage even more. Literally every single muscle in your lower body (which there are a lot) is going to be firing off with this one.
Then, of course, your upper body is working as it does with any waves variation. You are going to be shredding through high calorie burn and getting a mean pump in your arms, chest, and back. Your core, as always, will be working hard in tandem with your lower body to stabilize it all.
- Grab the battle ropes with a neutral grip and position your body so there is some slack in the ropes.
- Get into a wide stance, about a foot or more than shoulder width apart - you can practice to see how wide is good for you before you start the exercise. You will be performing a side lunge to each side but your feet will remain in the same place.
- From the upright position with a wide stance, start performing alternating waves with your arms like you normally would and then perform a side lunge to your right side, lowering down to parallel, then press back up through your heel and pause for a moment at the top and then perform a side lunge to your left side.
- Continue performing side lunges to your right and left side for a number of reps. You are likely going to only be able to do 8-15 reps.
17. BATTLE ROPES ALTERNATE ARM WAVES SQUAT

Here is an easier version of the Battle Rope Alternating Arm Waves Squat Jump. Rather than jumping into the air, you are going to be performing a regular squat. But make no mistakes, just because it is easier than the squat jump doesn’t mean it is easy.
This exercise is going to work your legs like a bodyweight squat would but with added resistance due to the battle ropes. Then, your upper body is going to be working as usual with waves - endurance, endurance, endurance. But guess what, there is surely hypertrophy benefits in endurance training, don’t let anyone fool you.
This is the type of exercise that will build lean, sculpted muscle mass.
- Grab the battle ropes with a neutral grip and position your body so there is some slack in the ropes. Note: You can also try a hammer grip.
- Get into the same starting stance as you would a squat and bring your arms forward in front of you.
- From here, start creating the alternating waves as you normally would while simultaneously lowering down into a squat.
- When you reach the bottom of the squat, press up from the squat driving force through the heels of your feet.
- Continue squatting as you make quick, explosive alternating waves with your arms for a duration of time or a number of reps.
18. BATTLE ROPES SPLIT JUMP ALTERNATING ARM WAVES

Here’s another plyometric battle rope exercise for you. This time, you will be performing squat jumps with your alternating waves. This is arguably even harder than the squat jump version as the split squat jump is a unilateral movement.
It requires force production mainly from one side and even more stability because of that. If you want to build some nice legs and a big round, powerfully athletic booty, this is it. The split jump alternating arm waves is as athletic as a movement as it gets.
- Grab the battle ropes with a neutral grip or hammer grip and position your body so there is some slack in the ropes.
- Step your right foot back into a split squat stance.
- Starting performing alternating waves as you lower down into the lunge.
- Once you reach the bottom of the lunge (aka split squat), explode up from the front leg and bring your back leg forward so that when you land it becomes the front leg, and all the while, try to keep the waves flowing.
- When you land, performing a jumping split squat on this side and continue alternating sides with each jump as well as keeping the alternating waves going as rapidly as possible.
This is an extremely exhausting exercise if done correctly, so you are not likely to do long sets. However, work as hard as you can and as long as you can and when speed and form starting to break down, stop.
19. BATTLE ROPES JUMPING JACK

You know when they say something looks simple but it’s not? Well, the Battle Rope Jumping Jack epitomizes this. Just because you know how to do a jumping jack, which we assume most people do, doesn’t mean you are going to be able to do this exercise with ease.
For this exercise, you will be creating force that generates an arc-style wave down the rope toward the anchor point. With that, you will get very high engagement through your shoulders (especially the lateral delts) and upper back.
Moreover, this movement will also double down on core, hip and leg engagement. It’s like jumping jacks on steroids. It’s the perfect mix of cardio, strength, endurance and hypertrophy training.
- Grab the battle ropes with a hammer grip and position your body so there is some slack in the ropes.
- Position your legs and upper body like you would a normal jumping jack.
- With your arms down in front of your thighs/hips, jump your feet out while simultaneously swooping your arms upward like you would a jumping jack but in a more circular fashion and with your arms slightly in front of your body, not direction to the sides. Think about it like your are drawing a big circle in front and around your upper body, with one hand drawing one half of the circle and the other drawing the other half at the same time (although your hands won’t touch at the top or bottom).
- Continue creating this half circle arc with your hands moving in sync with each other, while jumping in an out with your feet simultaneously. Note: Your elbows will be fixed the entire time, with a slight bend in them.
- Perform as many reps as you can with good form.
We love using this exercise as a warm up before a weight lifting session or a burnout finisher at the end of a workout. It’s also a great exercise to throw into the main part of a shoulder workout.
20. BATTLE ROPE REVERSE LUNGE ALTERNATING ARM WAVES

The final exercise just demonstrates another way that you can make your alternating arm waves more dynamic and fill two needs with one deed (fat loss and resistance training at the same time).
The Battle Rope Rear Lunge Alternating Arm Waves is exactly as it sounds, it involves reverse lunges as you create your alternating arm waves.
It may seem easy, but trust us, it’s not. This is going to seriously test your balance, coordinations, strength and cardio abilities. It’s also going to build up muscle in your legs, glutes, and upper body very well.
- Grab the battle ropes with a neutral grip and position your body so there is some slack in the ropes.
- Stand tall with your hips in a neutral position and your feet about hip width apart.
- Start performing alternating waves then step back into a reverse lunge as you continue making the waves.
- Press up into the standing position and then perform a reverse lunge to the other side, again, all the while maintaining rapid alternating waves with your arms.
As you can see, there are so many ways that you can get creative with battle ropes. A lot of these leg movements we’ve added with waves can be done with slams or even whips. They can also be done with dual/double waves (rather than alternating, the arms/ropes are moving in sync with each other).
Two other exercise examples that we love to do with battle ropes are Battle Rope Burpee Power Slams and Battle Rope Skier Jack Waves.
The list really could go on and on, but we think this gives you an idea of how versatile and fun battle ropes are. You just have to get creative.

POWER GUIDANCE Battle ropes are all nylon sleeves covered to protect the rope from friction, more durable and will last many years of usage...
HOW LONG SHOULD A BATTLE ROPE WORKOUT BE?
It really depends on what kind of workout you are doing. If you are doing a HIIT workout with battle ropes, a normal workout length is around 5-15 minutes, but can be as much as 20 minutes.
If you are doing a finisher, then 2-10 minutes is a good length. If you are doing a stand-alone battle rope workout, it can vary, but usually no more than 30 minutes is ideal. Remember, your sets should be intense. For a stand-alone workout, you should rest about twice as long as your sets.
So if you do sets of 30 seconds, you’d rest for 1 minute. With that, 30 minutes should have you wiped out. As for warm ups, 5 minutes is plenty of time with battle ropes to get the blood pumping.
ARE BATTLE ROPE WORKOUTS ALWAYS FULL BODY?
Generally, yes, battle rope workouts are meant to be full body, either for endurance and fat loss or explosive strength and fat loss, or both.
However, they can be used in a non-traditional sense (non-traditional to battle ropes that is), by performing exercises in a way that you would free weights for hypertrophy, like doing presses, squats, pulls, and so on, all without any sort of undulation.
Nevertheless, this is not very common. Battle ropes are funnest and most effective when used as they are designed - undulating waves, whips, slams, and circles, as well as pulls.

BATTLE ROPE WORKOUTS
Here are some sample workouts that you can do using the exercises you learned above. We will start with a warm up then get into HIIT workouts, stand-alone workouts, and workout finishers.
BATTLE ROPES WARM UP
Before you do the battle rope warm up, do 3 minutes of dynamic stretches.
- Battle Rope Wave x 15 seconds (moderate intensity)
- Battle Rope Low Wave x 15 seconds (moderate intensity)
- Battle Rope High Wave x 15 seconds (moderate intensity)
- Battle Rope Inside Circle x 15 seconds (moderate intensity)
- Battle Rope Outside Circle x 15 seconds (moderate intensity)
Just one set each and rest 15 seconds between exercises.
BATTLE ROPE HIIT WORKOUTS
HIIT Workout #1 - Tabata (8 minutes):
Battle Rope Waves: 20 seconds work followed by 10 seconds rest x 16 sets
Note: You can choose any exercise you’d like for a tabata, but ideally you want an exercise that you can use max intensity for 20 seconds, which is why endurance based exercises like alternating waves, whips, or inside circles are best.
HIIT Workout #2 - 30/15 (~15 minutes):
- Battle Ropes Alternating Waves Squat Jumps
- Battle Ropes Power Slams
- Battle Ropes Side to Side
- Battle Ropes Whips
- Battle Rope Jumping Jacks
This workout is 30 seconds work followed by 15 seconds rest. You will do each exercise one after the other. After you’ve completed all 5, rest for 1 minute and then repeat for 2 more rounds (so 3 rounds total).
HIIT Workout #3 - AMRAP (10 minutes)
- Battle Rope High Waves x 20 seconds
- Battle Rope Side Raise Slams x 5 reps each side
- Battle Ropes Alternating Waves Squats x 10 reps
- Battle Ropes Russian Twist x 20 seconds
Only rest when needed (which may be quite a bit as a beginner to HIIT training, but really try to push yourself hard). Try to complete as many rounds as possible in 10 minutes.
NOTE FOR HIIT WORKOUTS: You should be using high intensity with every set you do in a HIIT workout, after all, it is High Intensity Interval Training.
Related:
STAND-ALONE BATTLE ROPE WORKOUTS
Your stand-alone battle ropes will look similar to HIIT but they will involve more rest time.
Battle Rope Workout #1 (sets x reps/time):
- Battle Rope Waves: 3 sets x 30 seconds (60 seconds rest)
- Battle Ropes Power Slams: 3 sets x 10 reps (60 seconds rest)
- Battle Rope Reverse Lunge Alternating Arm Waves: 3 sets x 8 reps each side (90 seconds rest)
- Battle Rope Inside Circles x Outside Circles: 3 sets x 15 seconds each (60 seconds rest)
- Battle Ropes Alternating Waves with Kneeling Get Ups: 3 sets x 10 reps (60-90 seconds rest)
- Battle Ropes Low Alt. Waves: 1 set x max burnout (go for as long as you can at high intensity)
Battle Rope Workout #2 (circuit):
Circuit 1:
- Battle Ropes Alt. High Waves x 30 seconds
- Battle Ropes Side Raise Slams x 30 seconds
- Battle Ropes Whips x 30 seconds
Rest 15 seconds between exercises. Rest 1 minute between rounds. Perform 3 rounds total.
Circuit 2:
- Battle Ropes Alt. Low Waves x 20 seconds
- Battle Ropes Power Slams x 20 seconds
- Battle Ropes Outside Circles x 20 seconds
Rest 20 seconds between exercises and rounds. Perform 3 rounds total.
Circuit 3:
- Battle Ropes Alt Waves Jump Squats x 10 reps
- Battle Ropes Russian Twists x 20 seconds
- Battle Ropes Alt Waves Split Jumps x 10 reps total
No rest between exercises and 60 seconds between rounds. Perform 3 total rounds.
Note: Rest 2 minutes between circuit
BATTLE ROPE FINISHERS
Finishers are great for people who have fat loss and body sculpting goals. However, they shouldn’t be done everyday if you workout more than 3 times a week. For example, if you are on a 4 day, 5 day or 6 day split, then 2-3 finishers a week on lighter or less taxing training days makes sense. It also depends on how intense and long your finishers are. A quick 2 minute finisher is different than a 5-8 minute finisher. So, use your best judgement.
FYI - For someone who does full body workouts 3 times a week, a battle rope finisher each session is perfectly fine and conducive to fat loss efforts.
Below are a few battling rope finisher examples, with exercises that are best for each.
Tabata Finisher:
- Alternating Waves
- Double Waves
- Circles
- Side to Side
Complete each exercise for 20 seconds then rest for 10 before moving to the next exercise. Rest 10 seconds between rounds and complete two total rounds. This makes the total time for this finisher 4 minutes.
30-20-10 Finisher:
For this finisher, you will be doing 30 seconds for the first exercise, followed by 10 seconds rest, then 20 seconds for the next exercise, followed by 10 seconds rest and finally 10 seconds for the last exercise. This is a very quick finisher to get that last push before you end your workout. It only takes 1 minute and 20 seconds, but it should be very intense.
Note: If you want to take this finisher up a notch, you can work your way back up to 30 seconds. So, you’ll go 30-20-10-20-30 (all with 10 seconds rest between).
Here are the exercises:
- Alternating Waves (30)
- Jumping Jacks (20)
- Power Slams (10)
Core Blaster Finisher:
4 rounds in total, 20 seconds work each exercise, rest 1 minute between rounds (no rest between exercises).
- Russian Twists
- Half-Kneeling Waves
- Side Raise Slams

HOW OFTEN SHOULD I USE BATTLE ROPES?
It depends on what kind of workouts you plan to do with the battle ropes, your training goals, and what other workouts you are doing.
For example...
Are you working out with weights 3, 4, 5 or 6 days a week?
Are you trying to lose fat or build muscle and strength?
Are you doing any full body workouts or just body part splits?
Are your workouts already very intense and taxing?
Do you want to do HIIT battling rope workouts, stand-alone battling rope workouts, battling rope finishers, or just use them to warm up?
As you can see, it is very hard to answer this question. There really is no one size fits all answer.
Overall, you just need to listen to your body and be honest with how hard you are training. If you think you need a HIIT workout each week or a couple finishers to sculpt your body and lose belly fat, then do it. Conversely, if your weight training session was already super taxing, then skip the battle rope finisher. The same thing with HIIT workouts, if you have the energy, then do one, if not, then don’t. You want to avoid overtraining, but you also have to push yourself to make significant changes and reach your goals.
WHAT ARE THE BEST BATTLE ROPES?
There are plenty of good battle rope sellers on the market. Amazon has plenty of high quality battle ropes to choose from too. Just read the reviews to see what others have to say.
The only thing we can suggest is that if you want the most durable battle rope, then go for a battle rope made of polydac. Also, avoid battle ropes with protective covers (sleeves) as they are an unnecessary way sellers differentiate themselves and charge more.
As for length and thickness, generally speaking, the best option is a 50 foot long (although 40 feet will do) 1.5 inch thick battle rope. This really applies to all fitness levels and men and women (with exception of massive men and tiny women, who may want a thicker or shorter rope, respectively).
You can learn everything about different battle rope lengths, thicknesses, and materials in our Battle Ropes Buyer’s Guide. All questions related to buying battle ropes are answered in that article.
If you just trust our 50 (or 40) foot 1.5 inch Polydac battle rope recommendation, then here are some Amazon sellers that we know have good battle ropes.


Sam Coleman
Author