

The Turkish Get Up is arguably one of the most functional exercises you can do and an essential kettlebell exercises to learn. In a nutshell, the kettlebell Turkish Get Up (or TGU for short) involves lifting a kettlebell from a lying position on the floor to standing up straight with the kettlebell overhead at all times.
The Turkish Get Up is a primal movement that provides tons of benefits and works so many muscles. And while it may seem simple in theory, knowing how to do a Turkish Get Up the right way is super important.
When people are just getting into kettlebell training, one of the very first exercises that they want to do is the Turkish Get Up. Rightfully so, the Turkish Get Up is a cool and powerful looking exercise.
However, when done incorrectly, a Turkish Get Up can be dangerous. The Turkish Get Up is actually an advanced kettlebell exercise, so it is important that you learn it correctly from the start. It’s worth taking the time to study the basics of the TGU before jumping into it. This is where we come in.
We asked kettlebell expert Scott Viala to put together a complete guide on how to do the Turkish Get Up. We have a video further below where he will walk you through exactly how to do a Turkish Get Up, step by step and with all the important tips, cues, and mistakes to avoid, that way you can maximize benefits and avoid injury.
We will also be addressing the benefits, muscles worked, how to incorporate TGUs into your training, and other frequently asked questions.

HISTORY OF THE TURKISH GET UP
While the origins of the Turkish Get Up are unclear, which includes where exactly the Turkish Get Up originates from and why it is called a Turkish Get Up, it is believed that a form of the get up has long been performed by wrestlers from regions in and around what is now Turkey.
One anecdote states that wrestling apprentices from the Middle East would have to first learn how to do a Turkish Get Up and then be able to do it with 100lbs before they could begin training. However, others claim this story applies to circus strongmen.
Some claim that the TGU was invented by strongmen in Britain and given the name “Turkish” based on the fact that it looked like the reclining seated position in Middle Eastern hookah lounges.
Another theory is that the modern TGU has been adopted from similar age-old exercises. Persian wrestlers perform a type of get up, which dates way back, with a piece of equipment that looks like doors (they are called Sangs). It’s possible that Turkish wrestlers modified that movement, and then modern training has modified it even more into what it is today. Again, this is just speculation, but it does make the most sense that the exercise dates way back and it has been modified and there have been various kinds of get ups throughout history. After all, it is a primal kind of movement.
All in all, we can’t be exactly sure what stories are true or what the history of the Turkish Get Up really is because there is no proof. Naming it the “Turkish” Get Up may just be a form of marketing, as makes it seem more cool and exotic (i.e. Bulgarian Split Squat and Romanian Deadlift). In any case, what we are sure of is the Turkish Get Up is extremely beneficial, which is why it is performed regularly by high impact athletes (especially combat athletes), powerlifters, strongmen, crossfitters, weightlifters, and nowadays, even bodybuilders.
Note: Most people will state that this is an old strongman and/or wrestling exercise. The strongman basis makes sense as it is an impressive feat, and the Turkish Get Up is performance like - to take a heavy weight from the ground up to a standing position. And while it is impressive to bear witness to someone doing a Turkish Get Up, especially with a very heavy weight, the benefits are far more profound than it simply looking cool...

BENEFITS OF TURKISH GET UPS
There are many benefits to adding Turkish Get Ups to your workout plan. We will go over the main ones now.
- Shoulder Health & Should Stability: The TGU will improve your shoulders stability through all three planes of motion. This will help you build the injury resilience we should all want for our shoulders. After all, the shoulder is one of the most injury prone joints in our body when it comes to working out, especially lifting weights (we are looking at you bench press!). Overall, it is a great exercise for strengthening the entire shoulder joint, which is great for shoulder health longevity.
- Scapular Stabilization: Just like your shoulder complex, your scapular stabilizer muscles (rhomboids, traps, posterior delts, serratus anterior, levator scapulae) will be strengthened.
- Core Strength: You core will be put to the test the entire exercise. You will be moving through multiple planes of motion with weight on one side, needing to keep yourself balanced and in control. This all requires core power. So, if you want great core strength and core stability, this is the exercise.
- Hip Mobility & Stability: The Turkish Get Up requires a lot of hip movement (from hinges to abduction, adduction, flexion, extension and rotation), which is great for improving hip mobility. Plus, while you are mobilizing those hips, you have a weight load being held over head, requiring your hips to be stable through it all. This will make all those hip stabilizer muscles stronger.
- Total Body Mobility: it’s not just your hips, you will be improving the mobility and flexibility of your entire kinetic chain.
- Total Body Linkage: The Turkish Get Up requires your body to be totally in sync. Again, your entire kinetic chain needs to be linked to make this exercise happen. This is great as you will target multiple muscle groups in unison.
- Eliminates Strength Leakages: Muscle imbalances and weak areas will quickly come to light when doing TGUs. This is going to help with injury resilience, coordination, balance and more. It’s also going to tell you what areas of your body (in terms of strength, flexibility and mobility) that you need to work on.
- Incredible Glute Activation: If your glutes aren’t firing off like crazy, you aren’t doing the Turkish Get Up correctly. TGUs require a lot of glute activation for drive, power and stability.
- Balance, Coordination, and Spacial Awareness (Proprioception): As this is a unilateral exercise with a relatively heavy weight load, you will be improving your balance and coordination in a very significant way.
- Static and Dynamic Movements: The Turkish Get Up involves both static and dynamic components, which will make you stronger and more explosive.
- Grip Strength: Needless to say, holding a kettlebell over your head for a prolonged period of time is going to require incredible forearm and wrist strength, especially as you should be crushing the bell in your hands to hold it in place. Your grip strength will improve fast with Turkish Get Ups.
- Time Under Tension: While you don’t think of Turkish Get Ups as the top muscle building kettlebell exercise, the fact that you are working almost all of your muscles at the same time with constant and prolonged time under tension makes them a great exercise for building muscle. The Turkish Get Up really puts a strain on your connective tissue (especially if you go heavy, relative to your strength). This aspect of building stronger connective tissue is great for both overall strength, hypertrophy and injury resilience. Moreover, the time under tension will have your heart rate up like crazy, so you will be burning a lot of calories after a set of TGUs.
- Full Body Power & Strength: This is kind of a combination of some of the benefits we mentioned, but all in all, you will build incredible full body power and strength with Turkish Get Ups. After all, you are lifting a heavy object off the ground to a standing position. This is primal strength we all need.
- Longevity: Being able to get up off the floor without weight is an ability a lot of old people lose. By doing it with weight now you will thank yourself when you get older.
- Carry over into sports: This kind of movement carries over beautifully into sports like martial arts.
- Leg drive!
- Badassness: If your confidence and pride doesn’t improve from doing a heavy Turkish Get Up, I don’t know what will. While the benefits are abundant, this ego-based benefit shouldn’t be overlooked.
All in all, the Turkish Get Up is a very dynamic exercise that requires a lot of focus (remember, just one set likely takes around 30 seconds), and that targets basically each major muscle group, moves you through all three planes of motion, and improves many pillars of fitness - strength, mobility, stability, and thus, durability.

TURKISH GET UPS MUSCLES WORKED
The Turkish Get Up is a total body exercise that requires integrated movements and muscle contractions across the entire body. So, you will be working many muscles when doing TGUs.
Furthermore, your muscles will be working both dynamically and isometrically, which is great for strength and explosiveness. Turkish Get Ups necessitate isometric contractions more than most big movements, while combining the dynamic joint actions of the hips, knees, shoulders, and elbows. It’s truly an all in one exercise.
Here are the muscles worked when doing a Turkish Get Up.
- Shoulders: This includes your front, side and rear delts as well as your rotator cuff and scapular stabilizers (which are technically part of your upper back).
- Core: Your entire core will be engaged during a Turkish Get Up, so your abs, obliques, serratus anterior, low back (spinal erectors) and all the small muscles in-between.
- Gluteals: Proper hip function is essential for Turkish Get Ups, which means your glutes are going to be firing off like crazy. Your gluteus maximus, gluteus medius and gluteus minimus will be fully targeted during Turkish Get Ups.
- Upper Back: Your entire upper back gets worked during Turkish Get Ups, which includes your traps, rhomboids, teres major and minor, lats, posterior deltoids, levator scapulae. This means you will be building incredible scapular stabilization.
- Forearms: Keeping those wrist straight and that kettlebell gripped tight is going to strengthen your forearm muscles incredibly well. Your grip strength will become super powerful.
The above are just the main muscles being worked, as even your chest, triceps, quads, hamstrings, and calves will be in on the action. It's really a full body exercise.

WHAT WEIGHT KETTLEBELL FOR TURKISH GET UP?
If you are just starting out with Turkish Get Ups, especially if you are a beginner to fitness in general, then you should honestly not being using a kettlebell at all. Practice the movement for the first week with just your bodyweight.
Test yourself daily. Get the movement pattern down pat. If you want, try to use a light object like a water bottle or a shoe. You’ll probably be surprised how difficult it is and how even just your bodyweight alone is a good workout.
Once you are comfortable with the movement (and you can do each step correctly), start with a light kettlebell.
A 5 to 10 pound kettlebell is a good starting weight for most people. Although if you are a stronger individual, you can probably get away with 10 kg or more (22lbs+).
Note: If you don’t want to start with just your bodyweight and you have some good experience with kettlebells or weightlifting, the average man that is a beginner of Turkish Get Ups should be fine with an approximately 20lb kettlebell and half of that for a woman.
One side might be easier than the other, so let that other side catch up before you increase the weight. This is the great thing about Turkish Get Ups, it fixes imbalances.
If you can do 5 on each side in under 10 minutes, then you can increase the weight. This could be a weekly or monthly increase depending on how often you perform Turkish Get Ups. Don’t over do it, but Turkish Get Ups are an exercise you can perform more frequently, it’s not like barbell squats where you would do them once or at most twice a week.
Go up in weight at a reasonable pace. If you only have 10lb increments (i.e. you are at 10lbs now and your next kettlebell size up is 20lbs), give it a try when you are ready but just use a lower rep count and take more time between reps.

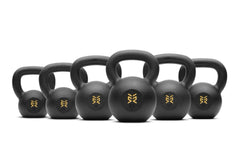
CHOOSING THE RIGHT KETTLEBELL FOR TGU
You should be using single casting cast iron kettlebells. While competition kettlebells can be used too, cast-iron are the best for Turkish Get Ups.
“Single casting” meaning the kettlebell is casted from one single piece of metal (not two pieces, with a handle connected to the bell).
Choose the right weight load. Even if you are a strong person, when learning this movement, start light. That way you can do the exercise properly though each stage of the movement. The main reason people hurt themselves with the TGU is that they start with a kettlebell that is too heavy and load it improperly through poor form - weight follows form.
Buy Kettlebells from SET FOR SET
HOW TO DO A TURKISH GET UP
First, we have an in-depth video of how to do a Turkish Get Up by kettlebell expert and coach Scott Viala. Then, below, we have a summary of the How To TGU video with step-by-step pictures and instructions, as well as common mistakes.
In the above video, Scott will show you how to do a Turkish Get Up. He will breakdown each stage of the TGU, emphasizing tips, cues, and common mistakes so that you fully understand the various phases/steps of the movement.
While it is a long video (13 minutes), we highly recommend you watch the entire video and pay strict attention to the cues. After watching and listening to Scott perform the TGU, you will know exactly how to perform the exercise with all the nuances each step of the way.
You can even grab your kettlebell and follow along to the Turkish Get Up with Scott as he will walk you through it slowly. Throw the video on and it will feel like you are right there with Scott in his kettlebell class getting your Turkish Get Up license.
As always, you will start with the ASCENT...
STEP 1: HUG THE KETTLEBELL

- Lie down on the floor on your right shoulder (like when you are sleeping on your side - aka the fetal position).
- Grab the bell with your right hand in an underhand grip and bring it in tight like you are hugging it. The handle will be across the palm of your hand.
- Roll on your back and bring the kettlebell with you so it is on your chest almost like a racked position while laying on the floor. Keep tension in your body as you roll flat onto your back.

STEP 2: FLOOR PRESS

- Make sure your right leg is bent with the bottom of your foot to the floor and your left leg extended out slightly to the left side.
- Press the kettlebell straight up overhead, fully extending your arm and using the bent leg for leverage and stability. Keep your shoulders stacked and core tight.
**Keep your eyes on the kettlebell the entire time through each step**
Common Mistakes:
- Bent Wrist - make sure your wrist is straight, don’t let it bend backwards.
- Shoulders not stacked - make sure your shoulder is pulled down and into the floor so that the kettlebell is secure.
- Arms not locked out - keep your arm locked out and fully extended as it is stronger this way.
- Poor arm alignment - make sure your arm holding the kettlebell is straight up so that it is perpendicular to the floor.
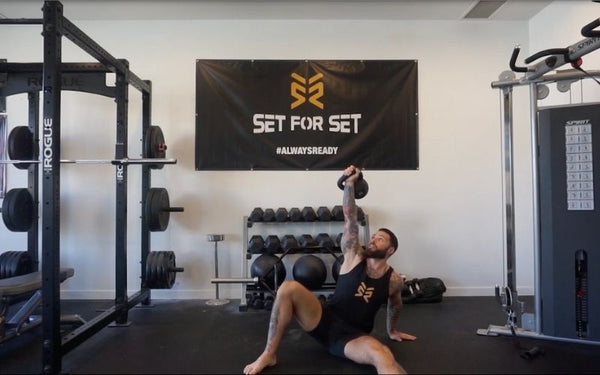
STEP 3: SIT UP (HALF TURKISH GET UP)

- Place your left elbow and forearm to the floor, arm extended straight and to the left side. This is your supporting arm.
- Push off your right heel and explode onto your left forearm. Keep your core tight as you do this.
- Keep your lats stack and tension on the kettlebell arm as it is held up over your head. Your left arm will be at a 90 degree angle with your forearm to the floor. Make sure your left arm is held strong and tight.
- From there, come up onto your left hand so that your palm is to the floor.
- Make sure that your knee and hip is nice and open.
Common Mistakes:
- Shallow bend in knee - make sure you have enough bend in the knee beofre you sit up, so that you can drive force from your foot into the sit up.
- Rolling into a sit up - don’t roll to the side to sit up, come up at an angle following the line of your arm.
- Coming straight up like a standard sit up - don’t go straight up like you would a sit up, sit up at the angle following the line of your arm.
- Not keeping core braced - if your core is braced you won’t have to overload your planted arm too much. In fact, you won’t have much pressure on it if done correctly.
- Jerking sit up - explode up but in a controlled smooth manner, don’t rock up or jerk up using momentum.
If you have trouble sitting up smoothly, you likely have a weak core and this needs to be addressed. Do core exercises to strengthen your core.
If you have trouble keeping the bottom leg straight while sitting up tall with the kettlebell overhead, you likely have tightness in your hamstring, so work on hamstring flexibility.
STEP 4: HIP EXTENSION

- With your right foot planted, drive your hips up off the ground. Keep your core braced as you do this, and your left heel to the ground. Your hip should be in full extension at the top. Really squeeze your glutes for this.
- There should be a straight line from the kettlebell to the bottom left hand. Make sure to open up your chest and create distance between your left shoulder and ear.
Common mistakes:
- Raising the heel - when you push your hips up, make sure your planted foot (in this case your right foot) is flat on the ground as this will help keep your base in a safe position. This will also ensure that hip extension comes from the hip rather than the toes.
- Raising the heel of your outstretched leg or turning your foot - don’t bring your extended legs heel off the floor or you will be overusing your hip flexors. Keep the heel to the floor.
- Not keeping shoulders packed - make sure you keep your shoulders deep into its socket so the kettlebell is secure overhead.
- Not opening up the chest - lift your rib cage and open up your chest, don’t let your chest collapse down/inward.
- Not using your glutes enough - really squeeze the glutes to get into full hip extension.
If you can’t extend the hips correctly, you may have tightness in your hip flexors (do these hip flexor stretches to work on mobility and flexibility).
If you feel you are extending via the lower back rather than the hips, you may have weak glutes (work on glute exercises and glute activation)
STEP 5: LEG SWEEP

- Your left leg will still be extended straight out, so from here, sweep the left leg back so that it is parallel with your left hand and your left knee is on the ground. When you do this, try to bring your leg straight back rather than around in a semi-circular motion. Remember to keep your eyes on the kettlebell.
- Rotate your left leg inward so that it is in line with the back of your right leg. It will also make your lower leg in line with your left hand.
You will feel that rotational mobility working here.
Common mistakes:
- Not opening up the hips - open up your hips so that you can bring your knee back so that is parallel with the left hand.
- Moving the panted hand - there should be no need to move the planted hand, just sweep your leg.
- Having the sweeping leg pointing straight back - if you keep your back leg straight back, you will have a lot of pressure on your spine (it will be bending), so by rotating it in towards your front leg (as seen in the pic above - left leg), you will take a lot of that pressure off of your spine and allow you to get a little hinge in your hips or even shift your body a bit safely (super important especially with heavy loads).
If you have tight hip flexors, this part of the TGU might be difficult for you. Hip flexor stretches should help with this.
STEP 6: HALF KNEELING

- Push off your left hand to come to a half-kneeling position. Make sure your core is braced, your glutes are tight, and your arm holding the kettlebell remains extended as you do this.
- Reassess your footing if needed to make sure your have a good half-kneeling position with your hips squared forward so you are facing straight ahead. Bring your left leg from the rotated position in the previous step so that it is shooting straight back as seen in the pic above.
- Your lats should be stacked, biceps parallel with the ears.
Common mistakes:
- Rounding lower back - keep your back straight by holding your glutes tight and hips forward.
- Skipping this step - Make sure you get into the position in full before standing straight up or you will be missing a key aspect of the movement which is great for your core.
- Not keeping squared forward - Make sure you are looking forward with hip not folding forward, your chest out and ribcage up.
- Not pressing up through the front foot - drive up from your front foot's heel and use your back foot for stability and balance.
If you have trouble with this position, you will need to work on core strength and glute strength. These are important stabilizers you’ll need.
STEP 7: STANDING

- Drive up like you would from a kneeling lunge keeping the kettlebell overhead with your arm extended. Keep your left hand out to your side for balance. Core braced for stability and ribs tucked in.
- Once you are in the standing position, keep your lats stacked and a lot of tension through the kettlebell.
Common mistakes:
- Not pushing up from the front leg - you should be pushing up from the front leg not the rear leg.
- Not keeping shoulders packed - keep the shoulder deep into its socket as you move into the upright position to ensure stability and that your arm overhead remains extended (not bent).
If you have trouble with this movement, practice overhead lunges with a light kettlebell and work your way up in weight over time.
Now to the DESCENT…
STEP 8: REVERSE LUNGE TO HALF KNEELING POSITION

- Step back with your left leg, like you would a reverse lunge. Keep everything in control by maintaining tension through your glutes, core, lats and shoulders.
- You will be back in the half-kneeling position. Make sure that lead leg is firmly rooted to the ground.
STEP 9: WINDSHIELD WIPER

- Rotate your left foot inward, so that you can push your hips back as you bring your left hand to the floor (palm down). You will be posted up on your left hand and there should be that straight line from the right arm with the kettlebell extended overhead to the left hand on the floor. Again, keep your eye on the kettlebell!
Common mistake:
- Having hand to close to knee - give yourself some clearance between your planted hand and the knee, that way you have a stronger base and more room for the next step.
- Having the hand too far back - you don’t want your planted hand back behind the knee, you want it right in line with it.
STEP 10: LEG SWEEP

- Keep your lats stacked and your core tight then sweep your left leg through so that it is extended out in front of you, slightly to your left side. Make sure to keep your hips high as you do this.
Common mistake:
- Not keeping hips up - as you sweep your legs through, use your glutes to keep your hips up.
STEP 11: SIT UP POSITION

- Bring your hips down to the ground, which will also have your left leg full on the ground. This will be the same position you were in at the end of Step 3.
STEP 12: SLIDE DOWN TO THE FLOOR

- Keeping that kettlebell held overhead with your arm full extended as it has been since Step 2, slide your left hand back as you slowly and in full control come down to the floor with your back flat to it. Your left arm will be extended to the side on the floor as well at the bottom. This is the same position you were in at the end of Step 2.
Option 2: Instead of sliding your left hand back, you can plant your elbow and forearm to the floor and then slowly lower your back and the right shoulder to the floor.
Common mistake:
- Falling to the floor too quickly - you want to lower yourself in a controlled manner. If you can’t do that, you need to work on core strength or use a lighter kettlebell.
STEP 13: FINAL STEP

- Slowly lower the kettlebell down to the racked position on your chest, right elbow to the ground, then roll to your side (grab the kettlebell with your left hand as well as you roll to the side for more control).
- Once you are on your side, you can let the kettlebell go as the bell will have its base to the floor.

THAT’S IT. NOW ALL YOU HAVE TO DO IS REPEAT THE SAME STEPS WITH THE KETTLEBELL ON THE LEFT SIDE.
Note: Between each step, you will have a slight pause to make sure that you are positioned correctly and everything is good to go, but you won’t be holding any position for a considerable time normally. It reads a lot longer than it actually takes. That said, this is not a movement that you want to speed through, it is about control, so it does take much longer to complete one rep of a TGU than it does almost any other exercise. It should take you 20+ seconds to do one rep.
While there are slightly different variations to the Turkish Get Up, and most are fine, we prefer to perform them as described above and as Scott demonstrates in the video. You can consider the above to be the absolute standard, correct form.
TURKISH GET UP COMMON MISTAKES AVOIDED - SUMMARIZED
If you didn’t pay attention to the common mistakes within the steps, we suggest you go back up and read carefully. But, to emphasize some of the important ones:
- Actively get into the starting position with the kettlebell pressed overhead while lying flat. Meaning, as soon as you touch the kettlebell from Step 1, you are creating tension.
- Keep your wrists straight. Do this by “over-gripping”, which will bring the center of mass closer to the bones of your arm and makes for a stronger, safer position.
- Keep your arms locked out and your shoulders stacked deep into the socket - don’t let your shoulders go soft! In fact, don’t let any of your joints go soft.
- Your lead foot should always be planted to the floor, don’t let the heel come up. A lot of people do weird things with their legs because they are so focused on keeping the kettlebell up overhead. Well, keep that leg planted and you will have a stronger base which will make keeping the kettlebell overhead safer.
- Engage your core at all times. Without a tight core, the Turkish Get Up is not only difficult, but dangerous.
- Hinge at the hips, don’t rock when going from three-point to two point and two point to three points (half-kneeling to standing and standing to half-kneeling).
- Using a kettlebell that is too heavy!
Again, if you didn’t read the common mistakes within the steps, go back and do so, it’ll make more sense that way.

TGU PROGRESSIONS FOR BEGINNERS
Beginners will always be recommended to do Turkish Get Ups without a kettlebell to start. So, just go through the motions with your body weight only.
If you really want to drill the movements into your head and make them second nature quickly, begin by only doing a Half Turkish Get Up (bodyweight only). Practice Steps 1-3 (getting into the up sit up position with your palm to the floor), then reverse it. Drill these first three steps into your head.
From there, practice the Full Turkish get up, really emphasizing Step 4-6. If you have to, keep reversing Steps 4-6, like you did Steps 1-3.
When you are comfortable with the movement at 10 reps each side, add a lightweight kettlebell, but start with Half Turkish Get Ups again. Just like you started, practicing Steps 1-3, but this time with the kettlebell. After you do 10 or so reps on each side and you feel comfortable with it, add the rest of the steps.
If you find it difficult to do a Turkish Get Up with a kettlebell or like your form isn’t right, go back to naked (no kettlebell) Turkish Get Ups. Don’t feel embarrassed, just keep practicing without a kettlebell until you get it down, then you can add weight when you are ready and progressively over time.
Feel free to keep referring back to our video above so you can nail the Turkish Get Up the right way.

HOW TO INCORPORATE THE TURKISH GET UP INTO YOUR WORKOUT PLAN
Turkish Get Ups are great to do as a warm up (actually like a post-warm up so you aren’t going into them completely cold) or they are great to throw into a strength training session at any point.
Some people even do Turkish Get Up only workouts, but that is not so common, unless on an active recovery day.
If you do them as a warm up, you will probably be going relatively light. In this case, do 3-5 each side after a bodyweight dynamic warm up. Remember, one rep is going to take you around 30 seconds, and you’ll need a short rest between sets so 5 each side is going to take around 10 minutes.
If they are part of your workout, you probably will want to stick to around 5 each side in total. You can break that down in different ways depending on the workout protocol (i.e. circuit or sets x reps). If you are going relatively heavy, you could do 1 each side for 5 sets, or 5 rounds if part of a circuit.
If you do them at the end of a workout, the same applies. If you go heavy, the volume will be lower (i.e. 1 each side for a few sets). If you go light, then you can do 3-5 each side back to back (either one side at a time or alternate sides each rep) with rest only as needed.

FAQ ABOUT KETTLEBELL TGU:
HOW MANY TURKISH GET UPS SHOULD I DO?
Doing 10 Turkish Get Ups per day is totally fine. So, 5 each side. Unlike other kettlebell exercises (and strength training exercises in general) you can do Turkish Get Ups every day as long as the load is not too heavy. If you do heavy load Turkish Get Ups, then give yourself a couple days between TGU sessions.
HOW OFTEN TO DO TURKISH GET UP?
Turkish Get Ups are one of those exercises that you can do every damn day.
You can do them as a warm up (right after you get your body warm with some bodyweight movements and mobility work), you can throw them into the main workout, or you can do them at the end of a workout. You can switch things up every day. It’s up to you.
You don’t have to do them every day either. But if you want to master the Turkish Get Up and get stronger at it, we recommend doing them at least 3 times per week.
HOW TO INCREASE TURKISH GET UP WEIGHT LOAD?
Using the weight you are comfortable with, instead of going from position to position, hold the position for 5 to 10 seconds. This is isometric strength building that should help you get stronger for a heavy kettlebell.
Don’t go up unless you are absolutely ready. Pushing it too hard can lead to injury which will only set you back. You should know when you mastered a weight and are truly ready for a heavier challenge.
We hope this how to do Turkish Get Up guide helps you on your journey to mastering the Turkish Get Up. If you have any questions, please feel free to reach out to us!
Related Content:
More Kettlebell Training Resources:
- Kettlebell Leg Exercises
- Kettlebell Shoulder Exercises
- Kettlebell Bicep Exercises
- Kettlebell Tricep Exercises
- Kettlebell Chest Exercises
- Kettlebell Squat Variations
- Kettlebell Deadlift Variations
- Kettlebell Lunge Variations
- Kettlebell Row Variations
- 50 Best Kettlebell Exercises
BUY KETTLEBELLS FROM SET FOR SET


Sam Coleman
Author